Showing posts with label pamela smerker designs. Show all posts

Tuesday, March 24, 2015

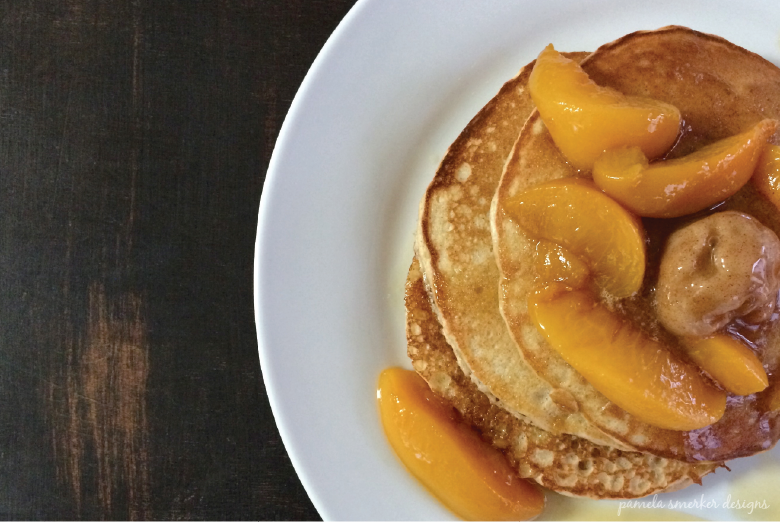
Peach Pancakes With Cinnamon Honey Butter {Recipe}

The kids are on Spring Break, so with all of us home the week I thought it would be fun to create a meal from a vacation destination. The kids often ask about Las Vegas, the bright lights, the shows and since Al and I have only been there once when we were first married I thought this might be a fun place to "pretend" to visit through food. 

 I decided to pick a dish off the menu from thWynn Resortin Las Vegas created by the famous chef Tai Ronnen.  The Wynn Resorts have a great menu, where I found my inspiration ... peach pancakes with honey butter! 

Here are my recipes to recreate this dish:
Cinnamon Honey Butter
1/2 cup room temp butter
1/8 cup honey
1/8 cup powdered sugar
1 teaspoon ground cinnamon
Using a mixer, beat together the butter and honey until combined, then slowly add the powdered sugar and cinnamon until smooth and creamy. *Refrigerate after use
Peach Compote
2qty 15 oz cans of sliced peaches with juice
1/3 cups light brown sugar
1/4 teaspoon lemon juice
Combine peaches with juice, brown sugar and lemon juice in a sauce pan and bring to a boil (watch carefully so it doesn't boil over). Turn down heat to a simmer until juice has thickened into a syrup. Keep warm until ready to serve. Refrigerate left overs. 
Cinnamon Applesauce Pancakes
2 cups Bisquick
2 tablespoons light brown sugar
2 teaspoons ground cinnamon
2 eggs
1qty 12 oz can Evaporated Milk
1/2 cup cinnamon applesauce
2 tablespoons vegetable oil
1 teaspoon vanilla extract
Combine dry ingredients in a bowl, combine wet ingredients in another bowl, then combine everything together. Using a 1/3 measuring cup, pour batter onto a lightly greased griddle. Sides will brown quicker, because of the sugar in the mix. 

These three recipes work so well together and would be great on their own with other items. My family loved these pancakes and we are now excited to make our way to Las Vegas someday and try out chef Tai Ronnen's version at the Wynn Resorts. 

Wednesday, March 11, 2015

Super Soft Sugar Cookie Bars Recipe


I LOVE soft sugar cookies with buttercream frosting, but seriously dislike the time it takes to roll out the dough, cut into cute shapes and continue repeating until there is but a scrap of dough left. Then when you are finished doing all of that, which takes quite a bit of time, there is the frosting and finding enough room and plates to lay out all of those cookies so they can set enough to find a place to store them all. Are you still with me?? Seriously the pain is real! 

I was SO excited when I found the recipe for these sugar cookie bars over at Somewhat Simple. While their recipe is fabulous I decided to give it my own little twist.  By the looks of it, this recipe has been tweaked a few times as it has been passed around through Blogland. That is the great thing about recipes, you can make them your own!


Here is what you need:

Sugar Cookie Bar:
2 1/2 cups all purpose flour1/2 tsp baking powder1/2 tsp salt1/2 cup unsalted butter, softened1 cup sugar1 large egg2 heaping TBS sour cream1/2 tsp vanilla extract1/2 tsp lemon extract 

Buttercream Frosting:
1 cup butter, softened
3 cups powdered sugar 
1 tsp vanilla
2 TBS heavy cream

Beat butter, slowly adding powdered sugar then add vanilla. Use as much heavy cream as needed to reach desired frosting consistency. BONUS: Taste as you go, to make sure it's to your liking. 

Cookie Directions:
Preheat oven to 375 degrees. Place a sheet of parchment paper in the bottom of a 9" x 13" baking dish or pan, set aside. In a mixing bowl mix together flour, baking powder and salt, set aside. In a different bowl whip together with an electric mixer the butter and sugar until fluffy. Add the egg, sour cream, vanilla and lemon extracts until blended. Slowly add dry ingredients to the wet, until combined and form a dough. Gently press the dough onto the parchment paper in the pan so that it covers the bottom. Bake for 15-20 mins until the edges are lightly golden. Cool completely, then frost,  cut into squares and decorate if you like. Note: If you don't have parchment paper you can simply butter the bottom of your baking dish. I like parchment so I can pull the entire cookie out once baked, making it easier to frost and cut. 


I don't think I will ever do cut out sugar cookies again after making these. So easy and it takes such little time to put them together. PLUS, there are so many ways you can decorate these babies, which makes them perfect for any occasion! Give these a try and let me know what you think. 

DFTBA,
Pamela

Thursday, February 19, 2015

Tortilla Casserole Recipe

I have been making this dish for quite some time now and it is still one of our favorites. 


Tortilla Casserole

3 cooked chicken breasts cut up into bite size pieces
1 can Cream of Chicken soup
1 can Green Chili Sauce ( I use a small can of Stokes)
1/4 C Sour Cream

Tortilla chips
Shredded Lettuce
Shredded Mexican Cheese
Extra Sour Cream
Salsa

Combine the cooked chicken, cream of chicken soup, green chili sauce and sour cream. Spray a 9"x9" baking dish with cooking spray. Place a layer of tortilla chips in the bottom of your baking dish, then spoon the chicken mixture over the top. Sprinkle a 1/2 to 1 cup cheese over the top of casserole then bake at 350 degrees for 20-30 minutes or until bubbly. 


Serve casserole on top of a bed of shredded lettuce, top with salsa, shredded cheese & sour cream. Serve with a side of tortilla chips.

A great recipe that you can make ahead of time, refrigerate then bake later (within a day or two at the most).

Tuesday, February 17, 2015

DIY Family Wall Gallery

I created the "This is our favorite spot" poster months before we bought our new house and knew that it would have a place in our future family room. Since we have vaulted ceilings in the new family room I didn't want this one sign to look insignificant all by itself on such a tall wall. So I created a family themed wall gallery with images of the kids, the entire family and a few other pieces to go with it. 


I have a thing for numbers, the number 5 represents how many people are in our immediate family, both my husband and I grew up in families with 5 immediate members. The twelve 5 forty is our house number and I of course had to make that number 5 stand out. Love, the one word that truly represents us. I am so extremely blessed to have a family that loves each other, we really are a team! 

All of the black and white prints were done at Staples using their "Engineer Print Service", which costs next to nothing. I think I paid under $10 to have them all printed. I had bought all of the frames on sale at Michaels Craft Store & Ikea.

I LOVE this wall in our house & can't wait to create another gallery in my loft space.

Last week when I shared my dining room chair make-over I mentioned that I was waiting to get my new old table from my parents. This table is not only special because it belonged to my great grandparents, but as a little kid I remember my parents receiving this table and my Mom spending hours/months working hard to refinish it in her spare time. This past Saturday, Valentine's Day my parents came over and surprised us with it. I LOVE having a real table (not the huge round folding table we were using) that we can all sit around and share meals together, especially one that has so many memories. ***sigh***


Hey, have a great day and don't forget, today is the day to Send-A-Smile in the mail! In case you missed what this is all about, check out the post over on the Squatles blog.


Saturday, February 14, 2015

A Floating Shelf And Some Art

Last week I shared the chairs I painted for our dining room, today I want to share how I decorated the only full wall in the room with two simple items.

 Since I like to change things up I knew a floating shelf would be the best way for me to display items throughout the year easily. So I went to Ikea and bought their "Lack" shelf , which was only $20. It was super easy to install, I just needed an extra set of hands to help me keep it level since it is so long.


As luck would have it, I found this set of three prints at Ikea as well. (Sorry they aren't available online or I would give you the link) They are the perfect size and are colorful without being over powering.

I can't wait to create some of my own art as well to put on the shelf for holidays or other special occasions, like my son's graduation this Spring.


A little bit of time and money made a big impact on this space. Definitely going to buy more of these shelves so I can put them in the kids rooms to display their treasures!

Friday, February 13, 2015

Go Team Send-A-Smile!


I have started a year long project over on my other blog Squatles, called Send-A-Smile
Hop on over and see what it's all about. 

Thursday, February 12, 2015

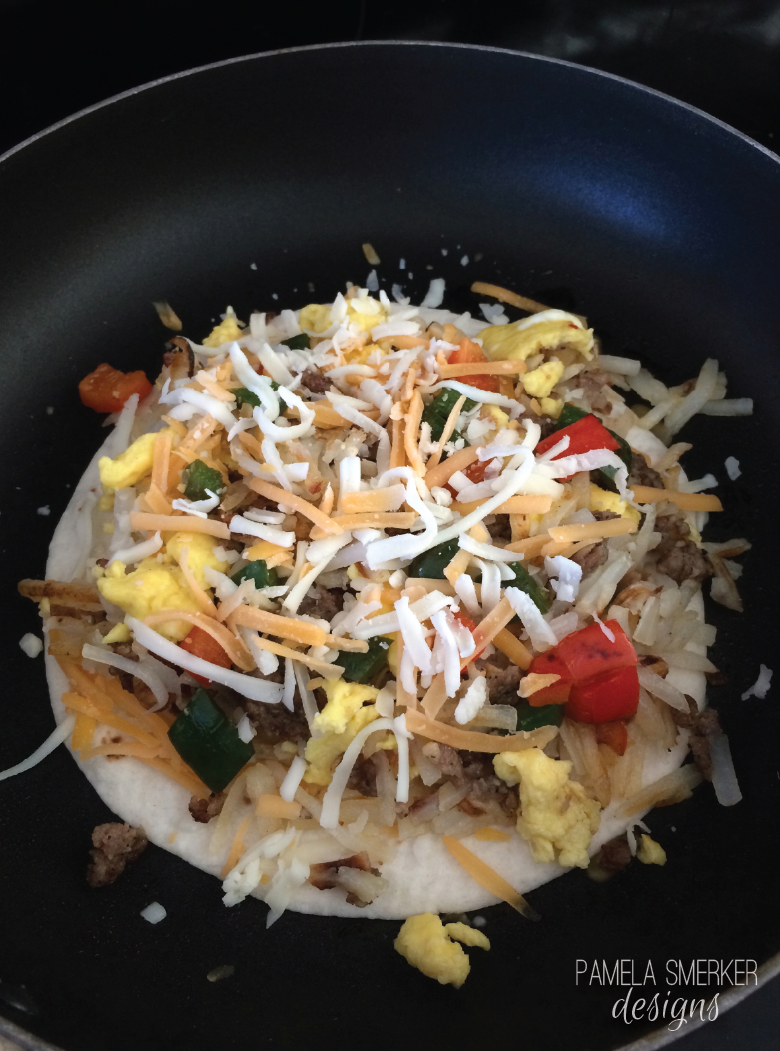
Breakfast Quesadilla Recipe


Sometimes when I am in a hurry or just not feeling inspired about making breakfast I create a hash of sorts. Scramble some eggs, brown some breakfast sausage and hash brown, maybe throw in some veggies, mix everything together and plate it.


Well I was feeling a little inspired and wanted to try something new. I buttered one side of a flour tortilla, placed it in a pan over medium heat, added a little shredded cheese, then piled on some of my hash, another sprinkle of cheese and to top it, another buttered tortilla. Flip the quesadilla over once the bottom side is browned and repeat.


These turned out really yummy and everyone loved them! Give them a try, make your own fun mix of food and see how it tastes inside a crispy tortilla sandwich!

Tuesday, February 10, 2015

Budget Friendly Dining Room Chairs

An Extraordinary Life at Twelve 5 Forty ~ DIY Decorating

Last year I was on the hunt for some dining room chairs that wouldn't break the bank. I ran across two Windsor Back chairs at a consignment shop that I frequent. The set cost me $20, which I actually had in shop credit, so that was a bonus! The other four chairs I found at an Estate Sale for $5 each. These chairs are old oak teacher's desk chairs and while they were basically stripped of their finish they were still very sturdy.  I knew with a little TLC they could look great.

Wednesday, September 17, 2014

MY LIFE SQUARED {9.1.14-9.15.14} EVERYDAY LIFE

Here is "My Life Squared", some of the moments I captured over the past few weeks. 


Since school has started back up I have been able to do a bit more creative stuff. Here are some boxes I created with a beautiful watercolor print. These were part of a nautical wedding photo shoot and I can't wait to see how everything turned out!!


My oldest son, Tyler and I have started making fun little felt creatures called Squatles. Tyler creates some of the "nerdy" designed Squatles while I create some of the "cutesy" Squatles. Take a look at our little blog as well as our Etsy shop.


In addition to our Squatles we will be adding other fun felt creations. Here is a 4' bunting that fits perfectly across a front door, we will also have 6' and 8' lengths available in October 2014!! I am personally in love with this particular color scheme of blush, charcoal, oatmeal and mustard, it screams Fall to me.


For the rest of the month I will be creating some more fun watercolor boxes for a big wedding event that I will be sharing more about mid October. I will be taking a short trip to Iowa to see family, which I will be sharing on Instagram so follow along over there. Last, I will be creating a ton more felty goodness with Tyler for the Squatles shop and Pumpkin Fest here in Littleton which is the second weekend in October.  (more details on that later as well).

Have an amazing day!!!
DFTBA,
Pam


Tuesday, August 19, 2014

In A Hurry Scrumptious Banana Muffins {Recipe}

My family loves banana bread, but sometimes we just don't have an hour to wait for a fresh loaf to bake. So I have started making what I call the "in a hurry scrumptious banana muffin". 


In A Hurry Scrumptious Banana Muffins
Makes approx. 12 muffins 

4 mashed ripe bananas
1/2 C white sugar
1 egg, beaten
1/3 C melted butter
1 tsp baking soda
1 tsp baking powder
1/2 tsp salt
1 1/2 C flour


Step 1. Preheat oven to 350 degrees F.
Step 2. Place parchment paper cupcake wrappers in a cupcake/muffin tin or use cooking spray in each cavity and set aside. 
Step 3. Whisk together the baking soda, baking powder, salt and flour together in a bowl and set aside. Step 4. In a separate bowl combine the mashed bananas, sugar, egg and butter together.
Step 5. Combine the dry ingredients with the wet ingredients and mix well. 
Step 6. Pour batter into muffin tin, filling each cavity approximately 2/3 full. 
Step 7. Bake for approximately 20 minutes and check with a toothpick. 


If you have any left over, place the extras in a ziplock bag and store in refrigerator or freezer. Feel free to add nuts or chocolate chips to your recipe. We like ours plain with melted butter fresh out of the oven!


Give them a try! 
DFTBA,

Pamela

Wednesday, August 13, 2014

Create A Party Greeting Station {DIY Decorating}

I had the pleasure of being an Ambassador over the Summer for The Flair Exchange. In the last Ambassador kit, I received the new "Poolside" Hexagon Honeycomb Garland  and coordinating "Peace, Love & Party" balloons. I love these colors and again I can't say enough good things about the quality of The Flair Exchange's products. Seriously love!! 


Typically when we have guests over for dinner there isn't really a need for party decorations, but I thought I would mix things up a bit. Since I had these great new decorations on hand,  I thought it would be fun to decorate a greeting station by my front door to welcome dinner guests with a dessert hors d'oeuvre when they entered the house.


  Astonishing Cakes designed and created these amazing cakepops that not only started a conversation, but were delicious too! Plus every meal should start with dessert...right?!  


I feel that every party, big or small should end with a little favor. So, I filled plain white Alto favor boxes decorated with a little hexagon tag I created with candy for guests to grab as they walked out the door.  Party success without a bunch of hassle. 


DFTBA, 
Pamela

Here are links to a few more projects I created using The Flair Exchange's products:


Tuesday, August 12, 2014

Cherry Turnover Bites For The Win! {Recipe}

These sweet little treats were the perfect ending to a long day.


I may have actually jumped up and down with joy because I found this recipe from The Country Cook through Pinterest and it was SO GOOD!! I bet they would be delish with apple filling or even chocolate! YUMMY!! 

Hop on over to The Country Cook to get the recipe and give them a try.

DFTBA,
PS


Monday, August 11, 2014

DIY Sweet Shoes Party {Real Party}

I was invited to a fun DIY shoe decorating party by the lovely Renee of Astonishing Cakes. Renee had been seeing images of shoes by designers that looked like real confections and thought the concept would make for a fun party project friends could do together.


We were each asked to bring our own pair of shoes to decorate and Renee supplied all of the decorating supplies, which included paints, beads, faux cherries, faux nuts and caulk, which make for wonderful faux icing. You can see a step by step tutorial on the shoes I created in my previous post called Super Sweet Shoes


We were treated with both a sweet and a savory table to snack from while created. Being the confection-ista that Renee is, her sweet table consisted of iced sugar cookies, cake pops and cupcakes. All of which were delicious as well as gorgeous!


The savory table was where we grabbed veggies, pickle rolls, chips and fresh fruit flavored water.


Here are what the finished shoes looked like at the end of the party. As you can see I am the practical one, with my cute little tennis shoes I can wear all summer. I love how whimsical the over the top decorated shoes my friends made and can't wait to see where my friends wear these. You might be shocked to learn this type of confection decorated shoe can sell for $200 + a pair!


My boxes did play a little roll in the party too! Guests used my Yellow and Baby Pink Pinstriped Alto Gable boxes to take home a few cookies in.

Such a fun time, I can't wait to attend or host another DIY party of this sort.

DFTBA,
PS

Credits:
Party Concept, Styling, Confections by www.AstonishingCakes.com
Printable place cards and banner by www.DandPcelebrations.etsy.com
Alto Favor Boxes by www.PamelaSmerkerDesigns.etsy.com


Friday, August 8, 2014

Stir-Friday With Ramen Noodles {Recipe}

I have been making this dish a lot lately, because it's pretty easy and mostly because the hubby likes it a lot!


Stir Fry With Ramen
Serves 2-4

2 packages of Ramen (I use Top Ramen, just the noodles, not the seasoning pack)
1-2 chicken breasts cut into small pieces (about the size of a quarter and thin)
2 tbls Sesame Oil
5-6 baby carrots cut into quarters
1- 2 cups of snow peas
2 tbls soy sauce
1 tbls Spiracha chili sauce
1/2 C chicken broth

Directions:
1. Cook ramen noodles as directed drain and set aside.
2. With one tablespoon sesame oil brown the chicken, place in a dish and set aside.
3. Using second tablespoon of sesame oil saute the carrots for a minute then add the snow peas.
4. Mix together in a bowl the soy sauce, chili sauce and chicken broth
5. Return chicken to skillet along with the noodles. If your skillet isn't big enough this can all be done in a large pot.
6. Add sauce mixture, stir so that all ingredients are combined and noodles are covered and everything is heated through. If noodles are too dry and sticky, add a little more broth.


Give it a try and let me know what you think.

DFTBA,
PS


Thursday, August 7, 2014

My Life Squared Summer 2014 {Everyday Life}


Here is "My Life Squared", some of the moments I captured over my Summer break. 


Most of our Summer has been spent packing, moving and now unpacking. For the 4th of July we took a break and relaxed sitting on the edge of our neighborhood lake to watch fireworks with friends. The view at sunset was incredible! 


We were thrilled to finally get the keys to our new home and celebrate...


... and unpack (btw we are still unpacking).


I had promised my kids that they could pick out whatever color of paint they wanted their rooms to be and they could help paint. So far we have tackled my daughter's room. She picked out this gorgeous peach color by Pantone called Nude. Can't wait to show you how it turned out! 


We recently celebrated our Corbin's 15th birthday. I bought one of those small mylar balloon, removed the stick at the bottom and used the top to decorate a SB frapp for the birthday boy.


Corbin got to choose where we would go out to dinner for his birthday and once again he picked Mongolian BBQ. 


For dessert he wanted my chocolate cake with buttercream frosting (colored a pretty minty blue shade). 

Looking forward to seeing what the end of the summer has in store for us! Hopefully one more adventure before the kids go back to school. 

DFTBA,
PS


LinkWithin

Related Posts with Thumbnails