Showing posts with label spring. Show all posts

Wednesday, April 2, 2014

Popcorn Boxes, Not Just For Popcorn

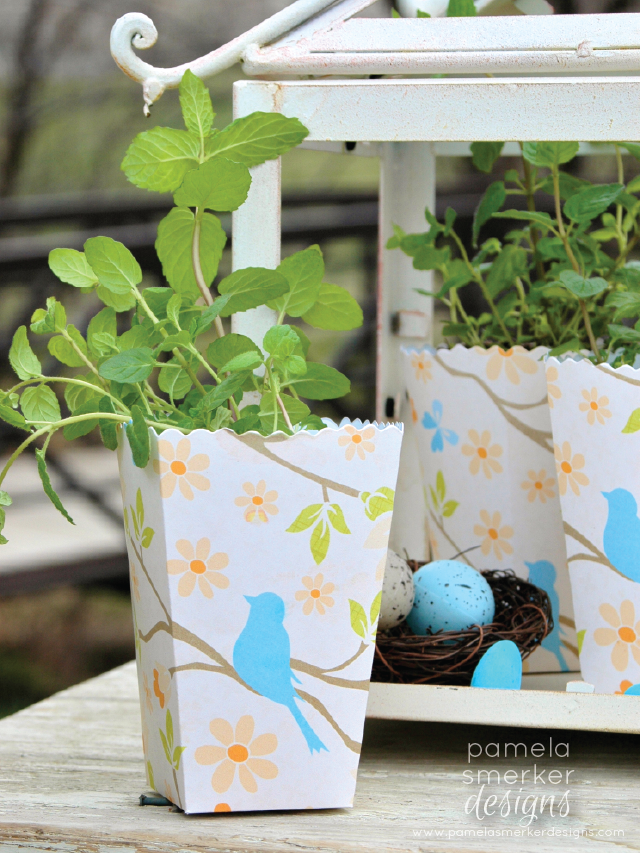
Popcorn boxes are perfect for not only serving popcorn in, but also other fabulous goodies and favors. I put these boxes together a couple of years ago for a wedding luncheon filled with herb plants as favors for guests to take home. 


The Sunny Days print (available upon request) and beautiful green leaves poking out of the top  scream Spring don't they! These would also be great gifts for Teacher Appreciation Week, Secretaries Day... you name it. Stop and think of all the possibilities! 

Happy Spring!! 

DFTBA,
PS

Wednesday, March 19, 2014

Inspired By Color ~ Citrus Green

I have always been drawn to the bright and crisp shades of citrus green.  For Spring I am saying goodbye to the lovely shade of orchid that was in my logo and saying hello to a fun bright shade of green (I told you like change).  


I thought it would be fun to do a little "Inspired By Color" post which includes some Spring items in this lime/apple green shade. 

1. If I were to go anywhere for Spring Break I would definitely want to pack up my things in this fantastic apple green suitcase. 
2. Perfect for Spring, a beautiful lime green shear scarf from Target to dress up any casual outfit. 
3. Definitely on my wish list for my next house, a green Kitchen Aid Mixer... LOVE this!
4. Have you seen blogger, OH JOY!'s new party line at Target? These paper cups are perfect for Spring or Summer. 
5. OK, I do need this iPhone case... come on it's green!! 
6. With Spring comes rain showers and this lovely green Totes umbrella will cheer up any gloomy day.

Don't forget to join me for a Pinterest party tomorrow night along with some of my fabulous friends. We will be pinning all things Spring!! #thinkingspring

DFTBA,
PS

Monday, March 3, 2014

Spring Oreo Cake

One of the most popular images on my blog according to Pinterest is the photo I took of the Oreo cake at Martha Stewart's Blogger's Night Out back in 2010.


Back to the cake, when I see my photo pinned there are usually comments like, "how was this put together?" or wouldn't this be fun on a smaller scale. SO I am sharing what I have learned from doing this myself.

Here is what you need:

3 packages of Spring Oreos ( they have yellow filling and some of the cookies have "Spring" time images on them).
An 8" in diameter cake plate or cake stand

Step 1. Starting on the outside place 10 qty Oreos around the edge of the cake plate so that they create a circle and are all touching on the sides. fill in the center with approximately 3-4 Oreos (I used the chipped or cracked ones for the inside since you won't see them).
Step 2. Start your next layer on the outer edge placing each cookie on top of where the bottom two cookies touch each other. Just like you would lay bricks. Keep going all the way around and fill up the center too.
Step 3. Repeat the process until you have 6 layers of cookies.


Just like the cake at Martha's event, nothing holds it together, just the weight of itself. How do I know, well because I watched a lady back into the cake and half of it fell on the floor. LOL I also tried going a bit smaller in diameter and it just didn't look right, I am sure it's a math thing LOL. Maybe you could go smaller if you use the mini Oreos, but that would take a of cookies! I want to say the original cake at Martha's took 30-40 packages of cookies, but I could be wrong. I know it was a TON though.

I am definitely going to do this smaller scale cake again for a party here at home and serve small glasses of milk with it.  I will also make it with the Mint Oreos, how pretty would that be with the dark brown and mint green...YES!

Have fun trying this and please share if you do! Don't limit yourself to Oreos, you could play with any sandwich type cookie.

DFTBA,
PS


Monday, April 11, 2011

Fresh Ideas for Easter Brunch {Motivate Me Monday}

Happy Monday friends! I wanted to thank everyone who voted for Party Starters for  the Top 25 list of Party Plannin' Moms contest on Circle of Moms contest. Today IS the LAST day to vote,  o if you have a second I would be honored!


Typically I like to share one, maybe two photos on Monday that get me motivated and hopefully you as well. With Easter fast approaching I thought it would be fun to share a tablescape I created which definitely got me in the mood for Spring! 


My Mom gave me a box full of Easter decorations and the kids had so much fun going through it. Lots of fun treasures inside and a few of them, like the rabbits and white wheel barrow worked perfectly on this table. The white wheel barrow was empty, so I put a piece of floral foam in the inside and with a bouquet of flowers I picked up at the grocery I not only made the wheel barrow centerpiece, but also 4 small bouquets for the table. 


The Easter basket was a bit of a struggle, because my decorative pieces kept getting lost and tipping over inside, even with shredded paper grass.  I decided to use a lid from a round hat box then covered it in moss which sat inside the upper part of the basket creating a platform for everything to sit on. The perfect solution for this situation and since there are so many great baskets out there I will be using this trick again! 


There is just something magical about planting seeds and seeing them sprout out of the dirt.  I filled my cake slice boxes, decorate like carrots with a packet of seeds for festive party favors. Of course this doesn't have to be for adults only, my kids are already calling which seeds they want. 


Last Easter I made mini cupcakes and displayed them in egg cups, so I thought it would be fun to use mini blueberry muffins this year. The perfect little treat for a Sunday brunch. 


 I used a 12" x 12" piece of pattern paper and cut it into this fun shape, which brings a little more character to the table and really makes the plate stand out. Fill up a Cake Slice Shaped box with crayons and instead of putting plates down set the box on top of these fun placemats. Crayons and fancy paper would make a great activity for the kids table, Tic Tac Toe anyone?

I hope these photos and ideas have got you motivated today. I am definitely ready to get to work making some more fun colorful projects...mission accomplished! 

Have a great day! 
Hugs, 
Pam

LinkWithin

Related Posts with Thumbnails